Nomyx tutorial, part 1: the GUI
a tutorial for the Nomyx newbie
Published on September 23, 2014
Hi there! Welcome to the Nomyx tutorial. This first part will guide you through the GUI of Nomyx and show you the basic game techniques. The second part will show you how to compose Nomyx rules. To get a first understanding of Nomyx, you can watch the introduction video. To follow this tutorial, there are two options:
If you don’t have an Haskell environment already installed, the second solution is recommended.
#Login
So let’s go! On the main game page, click on Login and follow the instructions. You can logging with a variety of methods (Google, Yahoo…) or simply with a login/password. After logging in, you will choose a screen name and register an e-mail. Registering an e-mail is important: the game is quite slow-paced, so you will receive an email whenever a new rule is submitted by another player. A game can last some weeks: usually the players spend 10 minutes per day to review the new rules, vote, and propose a new rule.
After this step, you will arrive at the main screen:


You can view any of the running games. For this tutorial, we will create a new game:
- Click on “Create a new game” and fill in the game name and description. Your new game appears under “Private games:”.
- Click on Join.
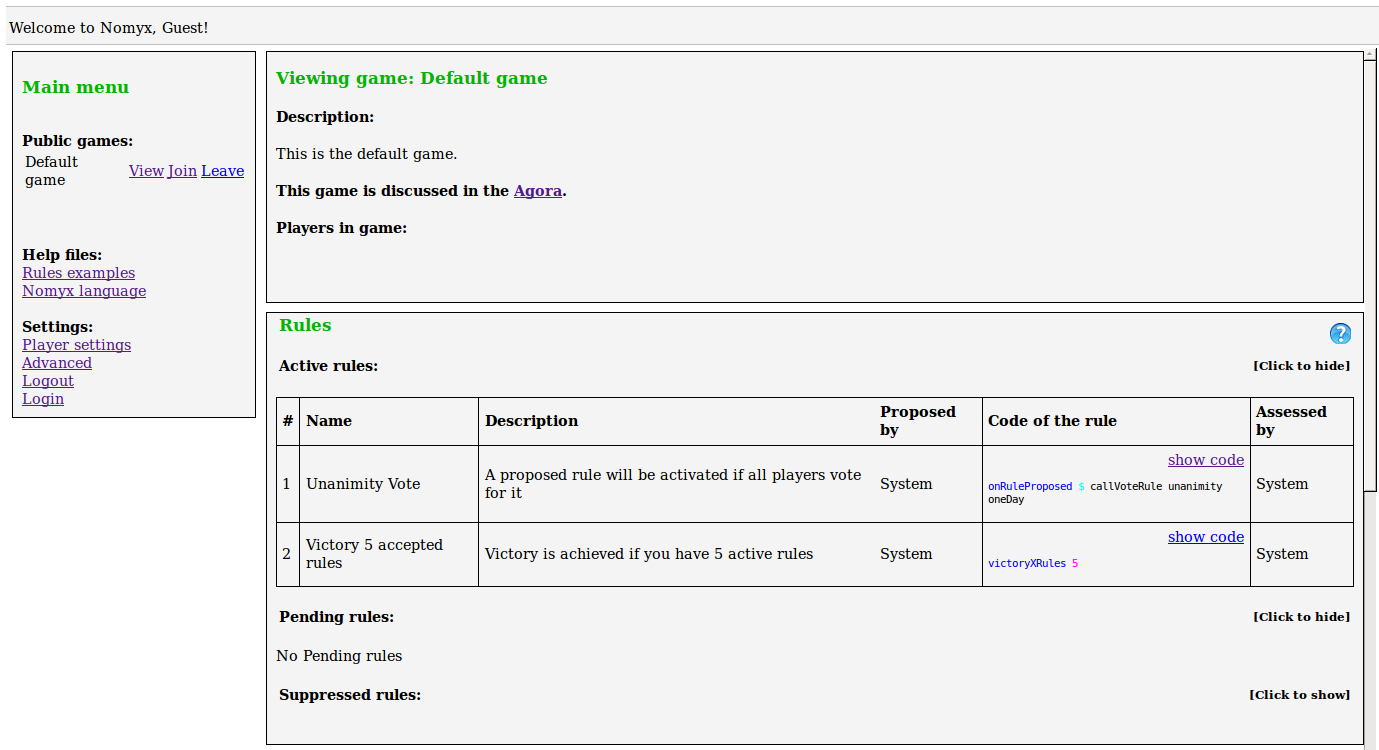
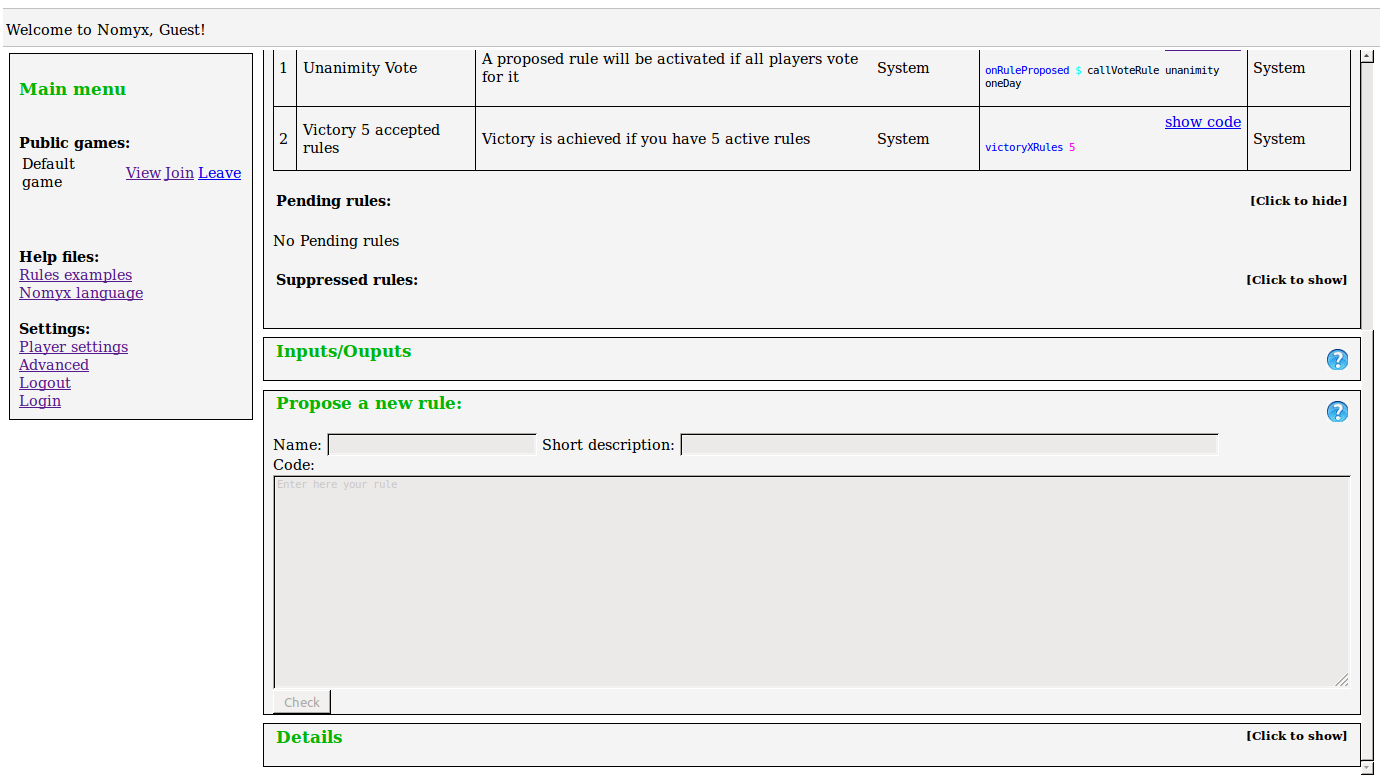
Please note that only the administrator can create public games. There are six main zones on the game screen:
- Main menu
- Game description
- Rules
- Inputs/Outputs
- Propose a new rule
- Details
#Game description
The first area is giving a description of the game. It also gives a link to the “Agora”, which is a forum or a mailing list that allows the players to discuss the rules being proposed. It is necessary to register with the Agora if you want to follow the game!
You can also find in this box the list of the players with their player number. The player numbers can be used in a rule to refer to a particular player.
#Rules
The second area shows all the rules of the game: they can be Active, Pending or Suppressed. The active rules are the one effectively ruling the game. But they can be changed, of course, as explained in the introduction video!
The Pending rules are the rules that have been proposed but are not yet accepted: usually a vote is on-going for these ones. The Rejected rules have been rejected (by another rule, naturally).
#Input/Outputs
The rules can trigger inputs (such as text boxes, buttons, checkbox and radio buttons). They will appear in this area. The rules can also display outputs that would appear as a string.
#Propose a new rules
This is where you submit your new rule. Fill in the boxes to provide a meaningfull name and description. The big box is where you type the code of your rule. It should typecheck to the type Rule. Let’s try with the first rule in the file Example.hs:
nothing :: Rule
nothing = return ()
Since the content of the box should typecheck to Rule, you cannot copy the integrality of this definition: you have to copy either the name of the rule: nothing or the body of the rule: return (). Please check the second part of the tutorial to learn more on how to compose rules.
Once you are ready, click on the “Check” button to verify if the rule is type checking correctly. If everything is alright, you can click on “Submit”. The rule will be added in the Pending rules and trigger a “Rule Proposed” event. The already active rules that are subscribed on this event will be waken up and will act on your proposed rule. Usually there is a “Votation” rule that will trigger a vote for all the players to decide wether to accept or not your new rule. If the vote comes out as positive, the votation rule will activate and effectively run your new rule. This is usually the only time where a rule is executed: a rule can only be executed by another already active rule. At this moment your proposed rule can modify the game state (for example it can suppress an existing rule). It can also register some code on some events: that’s how a rule can make an action on the game at some point in time after being accepted. For example your rule can register a callback on the event Player Arrive. The callback will be run by the Nomyx system each time a new player joins the game, maybe to send him a nice welcome message!
Advanced
Once you are getting used to the game, you will want to post bigger and more ambitious rules. However, the field to propose rules is rather small. Furthermore, it doesn’t allow to defined new types and helper functions. This can be accomplished by uploading a Haskell file in the “Advanced” page (the link is located on the bottom of the left menu bar). Using the buttons “Browse” and “Submit”, you can select an Haskell file containing your complex rules. This file should be a regular “.hs” file, like the example provided on the page. Let’s upload this file SimpleModule.hs for example:
module SimpleModule where

import Prelude
import Language.Nomyx
import Control.Monad

myRule :: Rule
myRule = void $ outputAll_ helperFunction

helperFunction :: String
helperFunction = "Hello"
Once submitted, all the definitions contained in the file becomes available in the game: they are “in scope”. Coming back on the main game page, you can see your uploaded file in the links under the title “Uploaded files:”. You can now submit the functions contained in your uploaded file by inserting their name in the “Propose a new rule” area, provided that they typecheck to Rule, of course:
SimpleModule.myRuleThis new rule can now be voted on by the other players just like a regular rule. Please use fully qualified names (as in the example above) when refering to a function or type defined in an uploaded file. Be carefull that once a file has been submitted, it cannot be deleted. If deleting or replacing a submitted file was permitted, it would allow a player to modify the behaviour of a game without voting, which is obviously wrong. Of course, nobody’s perfect, so having mistakes in uploaded files can happen! In that case, just upload another file with a version number attached: simpleModule2.hs and refer to its function definitions with fully qualified names: SimpleModule2.myRule. The alternative is to ask the administrator to delete the file.
Fork
A very interresting feature when discovering Nomyx is to “fork” an existing game. Click on “Fork” on any existing pulic game. This will create a new private game with the name “Forked game_name”. You can join this game.
As forked games are private, you will be the only one playing. However, the names of the players of the forked game are still present under the title “Players in game”. The idea is that you can “play as” any of the players. If you click on one of the players names (other than you own, obviously), you will see the game exactly as this player would see it. You can also take actions in the game in place of that player.
This is very practical to test the effect of one of your new rules! Before proposing a new rule in a public game, you can fork that game and propose your rule in this private game. You can then see what will be the effect of your rule on the game and on the screen of the other players. This is also an interresting feature for intermediate players that want to test their rules in a more complex environment than a fresh game. Please note that there is only one private game allowed per player: if you want to create a new one, you have to delete the existing one.